Yesterday, I had an interesting project come up to quickly update firmware before hardware was
manufactured where we had a large legacy C code base. This article is going to talk about how I used
Rust to quickly develop embedded firmware without needing completed hardware or needing to convert
any legacy firmware.
I’ll walk through how you can enable C- and C++-based driver development using Rust to make
development go a whole lot faster.
Background
I was recently working on a consulting project for a client that was building a new product
with some pretty tight timelines. We already had quite a large legacy C codebase from an existing
product and were going to leverage that for the new project. Unfortunately, we also needed
to change most of the part numbers in the hardware design due to chips reaching end-of-life. This,
importantly, included a visible light sensor that played a central role in the product. We needed to
build both new hardware and update the existing firmware to support the new design.

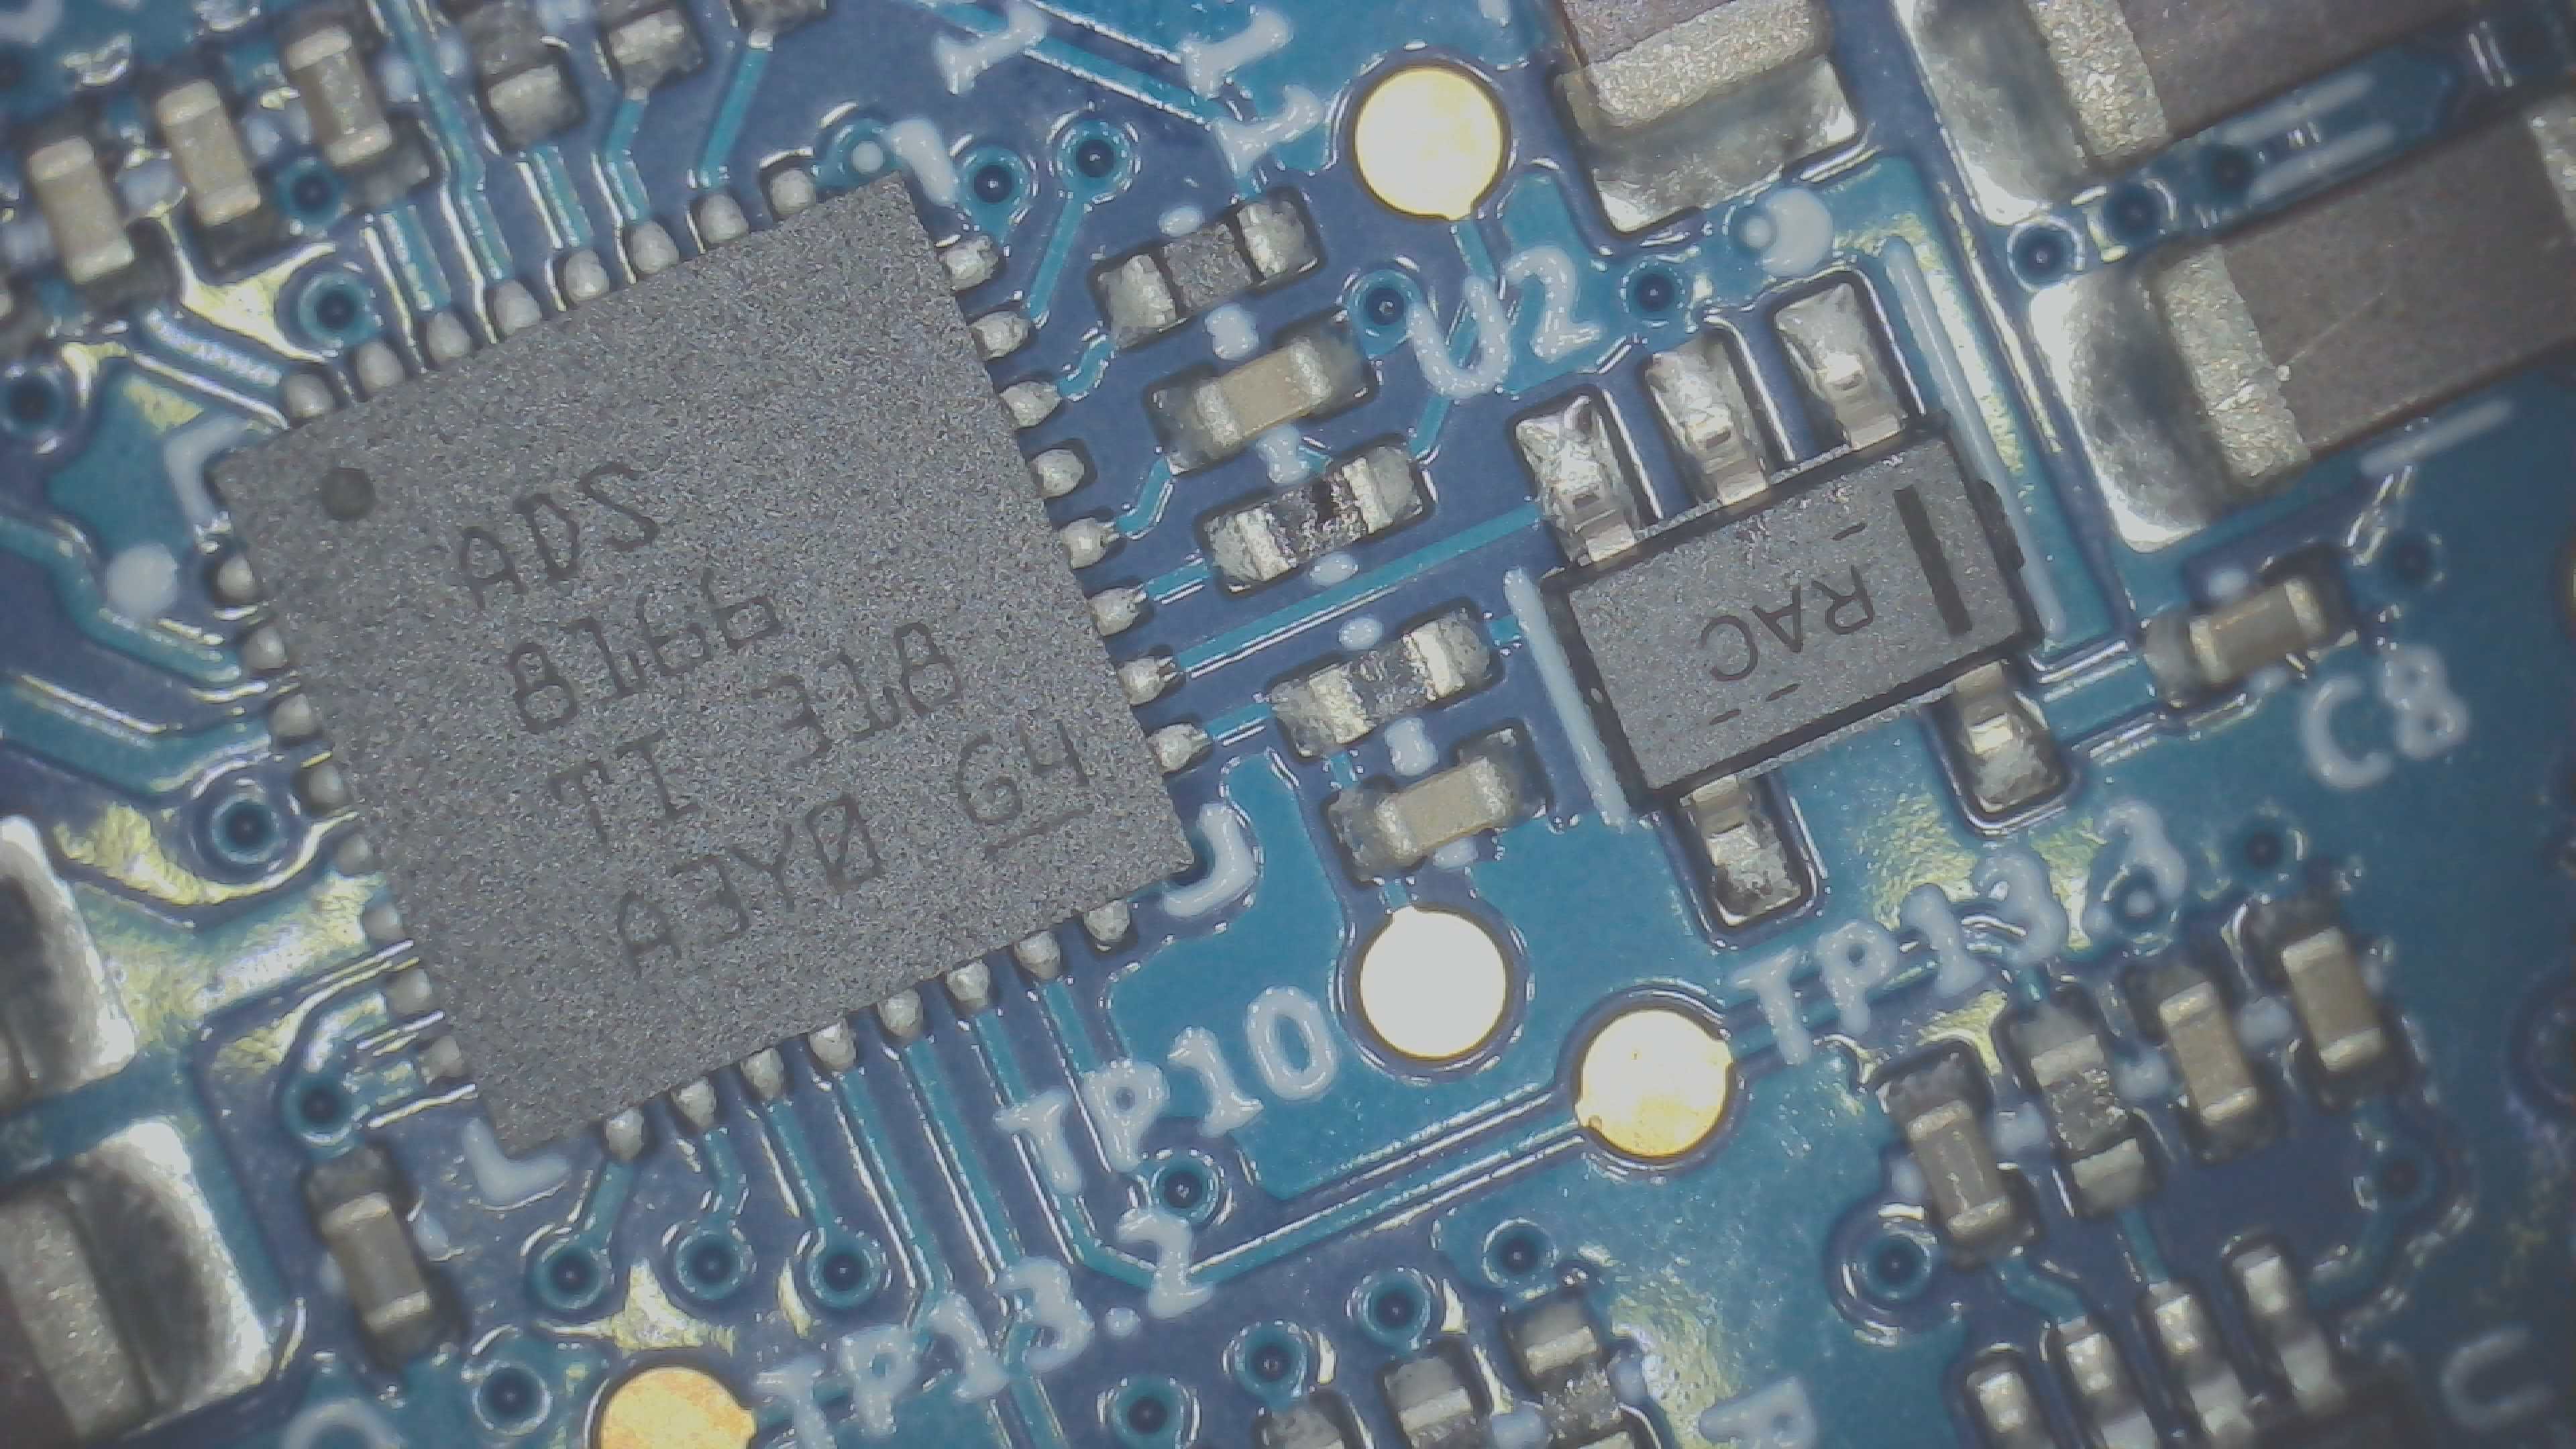
The ambient light sensor that I was replacing.
The replacement sensor was a newer revision from the same manufacturer based on the same
architecture, but they had shuffled around registers and changed the underlying design a bit.
Unfortunately, the documentation for these chips has been less than impressive - large portions of
the sensor don’t have any description as to how they work and not all registers and functions are
documented in the datasheet or application notes.
Because of this, it was looking like the best path forward would be to start testing out code as
quickly as possible and see how the chip responded. I bought a small development board from the
vendor to start up work on updating our driver source code.
While the board was shipping, I began updating our C-based driver for the new chip based on whatever
I could find in the datasheet and got everything ready for once the development kit arrived.
The Dev Kit
The board arrived a few days later, and to my surprise, the dev kit was a lot simpler than expected
and came with a pretty beefy USB cable. There’s not much on the actual dev board beside the sensor,
voltage regulation, and some EEPROM memory. It’s all connected up to an I2C bus that is broken out
to the pin headers on the board.
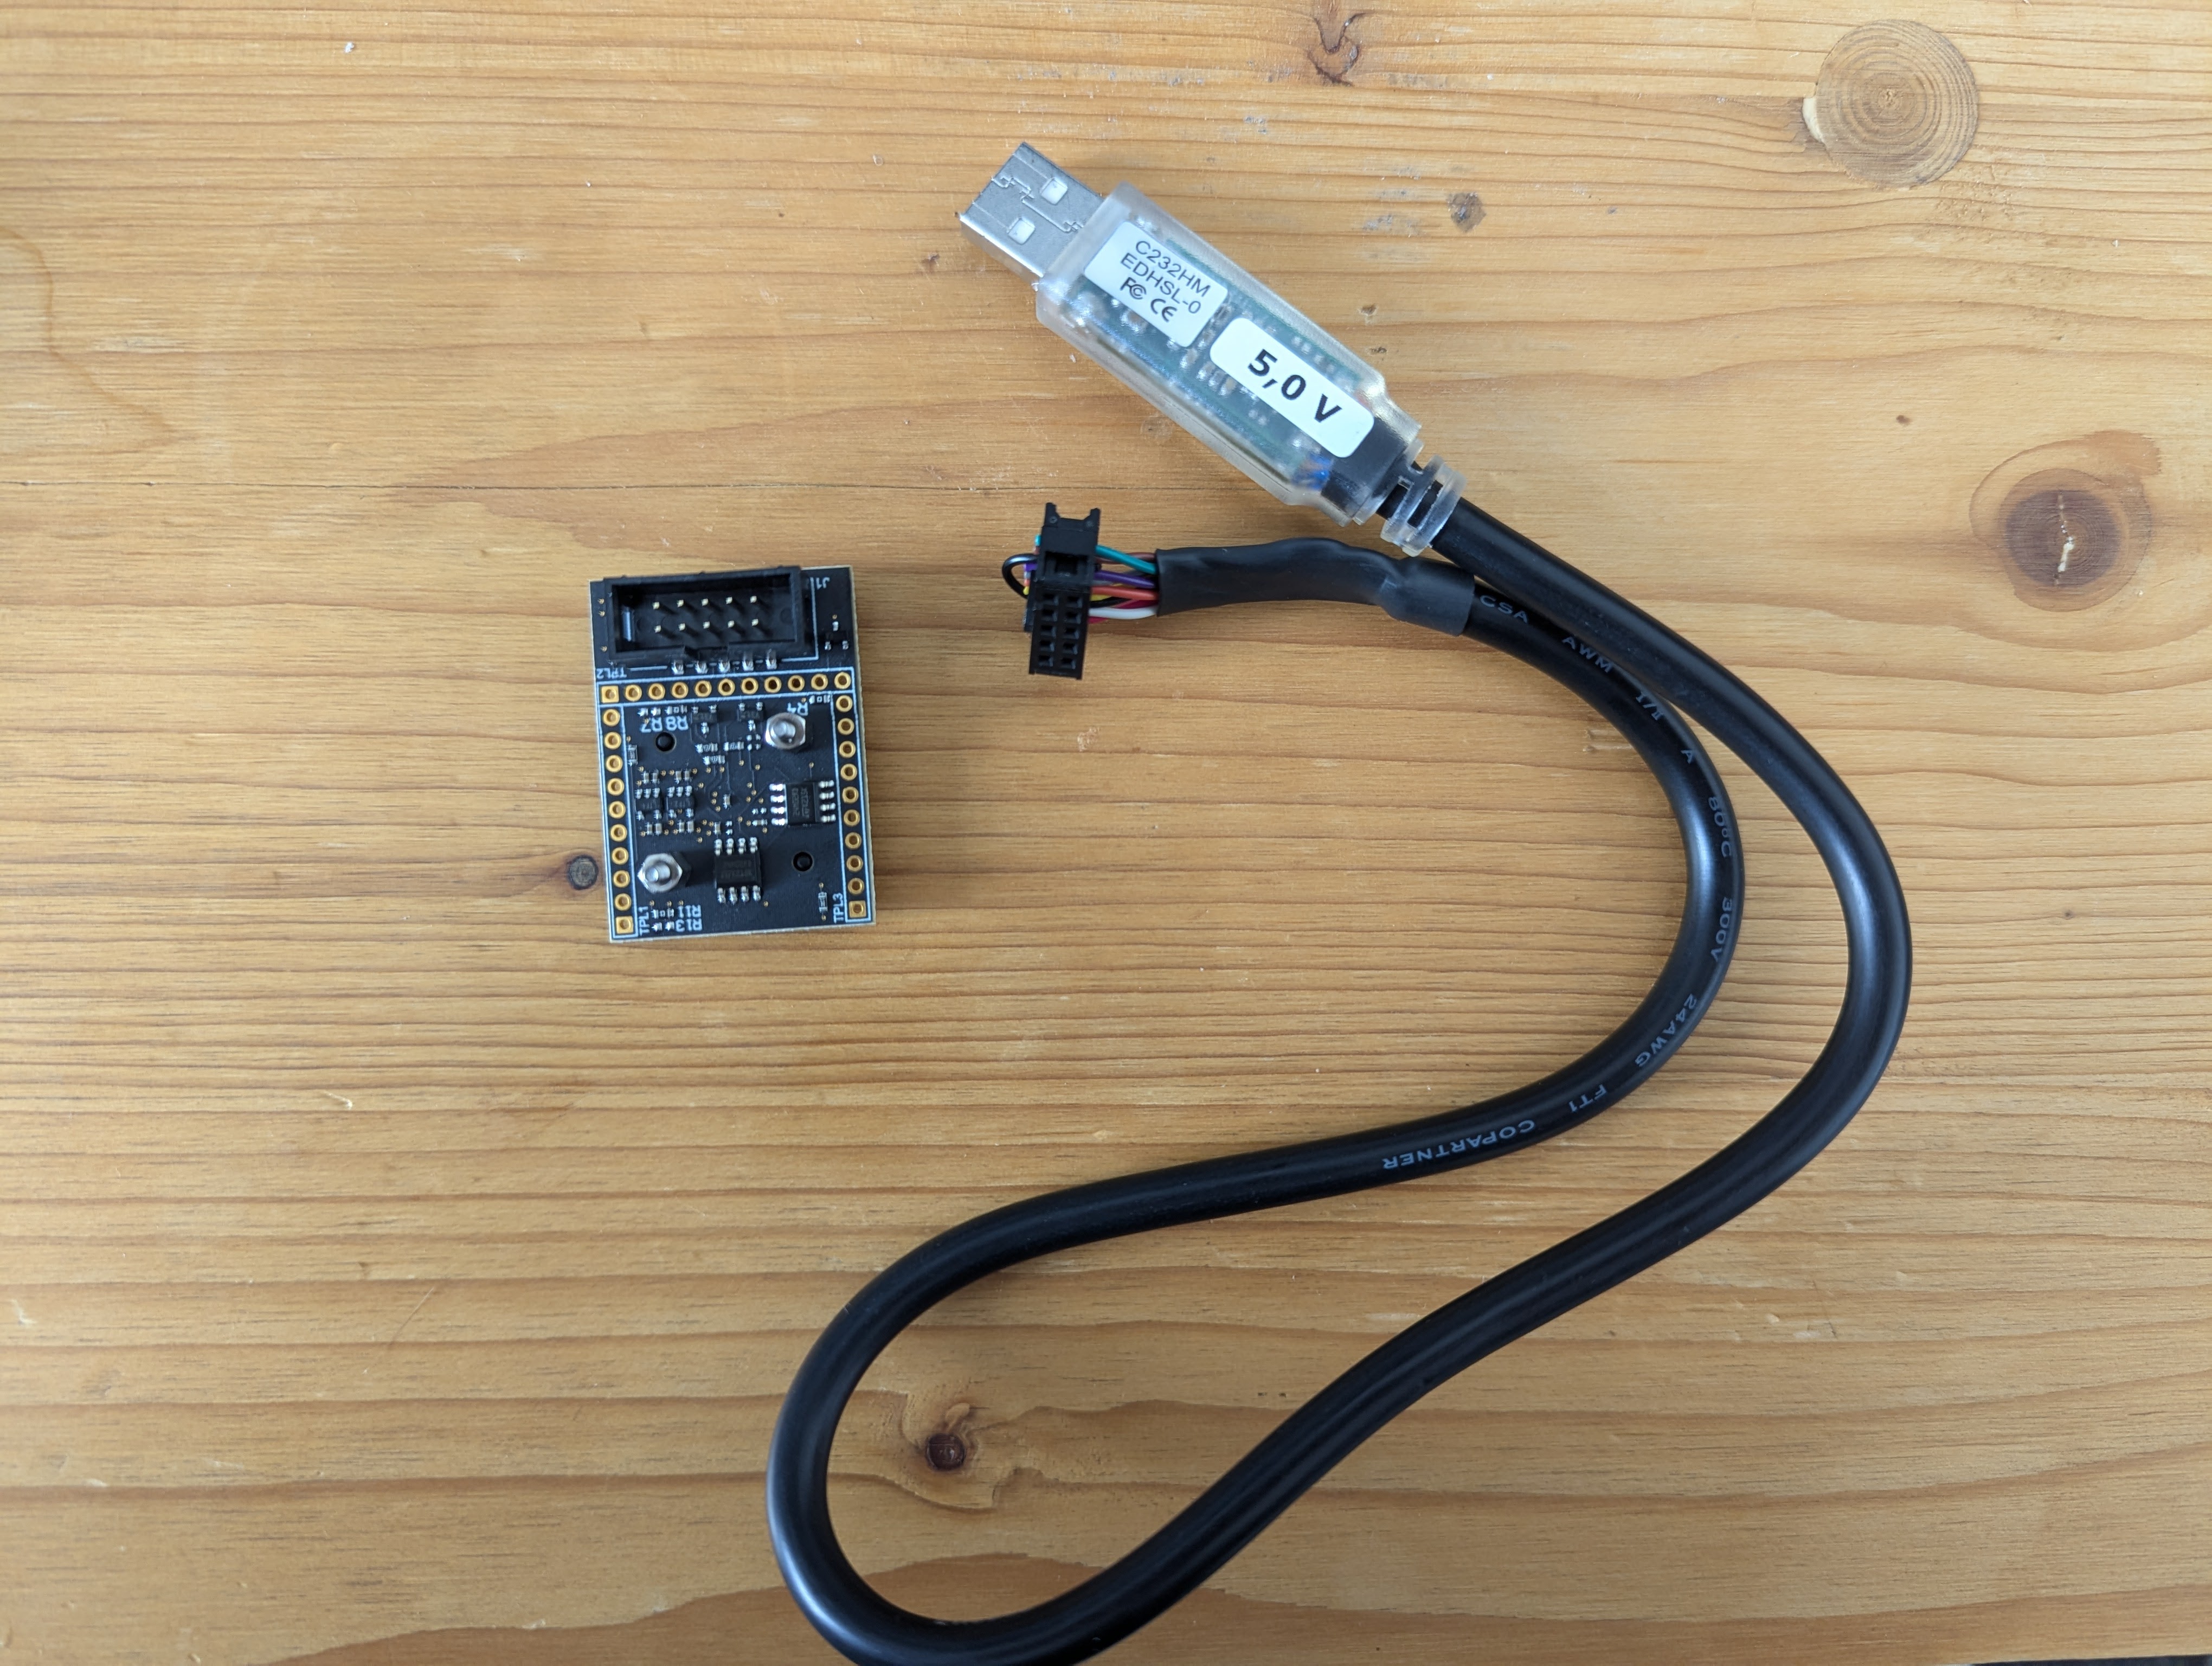
The dev board shipped with a FTDI C232HM cable, which is a USB <-> MPSSE (Multi-Protocol Synchronous
Serial Engine) adapter. This is a pretty cool FTDI chip that lets you talk USB <-> other
protocols such as SPI, UART, GPIO, or whatever you need.
Honestly, this made me pretty happy to see. Firmware is an often-seen failure point in systems, so
being able to talk USB<->I2C directly has been incredibly advantageous on a number of projects that
I’ve worked on, and it ultimately results in far simpler systems.
Writing and Testing a New Sensor Driver
I’ve been an embedded Rust developer for the last ~6 years at this point and prefer using it over
C. Unfortunately, C is a bit of a necessary evil in the industry that I work in. I try to be a
pragmatist and use whichever tool makes my job easiest on a given day - this involves lots of
Python and shell scripting to support the embedded C that I find myself writing.
Now that I had this dev kit and cable in my hand, I wanted to start testing out the updated driver
with the least amount of effort. I looked at my usual suspects in Python and C to try to interface
with the FTDI chip in the cable, but these all seemed like a lot of work to configure the MPSSE
engine, manage drivers, etc., and I still wasn’t sure how I’d test out my C code once I got it
working.
After not finding any other great solutions, I took a look on crates.io and
found a few libraries to talk to the FTDI chip. I set up a quick rust project, imported the crate,
and was talking to the FTDI chip with a single line of code. Overall, it was incredibly
painless and way quicker than I could have done with another language. That was a pretty promising
first start, but I still needed to figure out how to bring in the C code.
Replacing C with Rust
It’s important to remember that this driver was a small part of a big, legacy C project. Thankfully,
it was pretty isolated from the system and could be used stand-alone without too much effort. I
started to think about how I could migrate the C code into a Rust-based stack so that I could
exercise and update the driver without needing the rest of the C firmware.
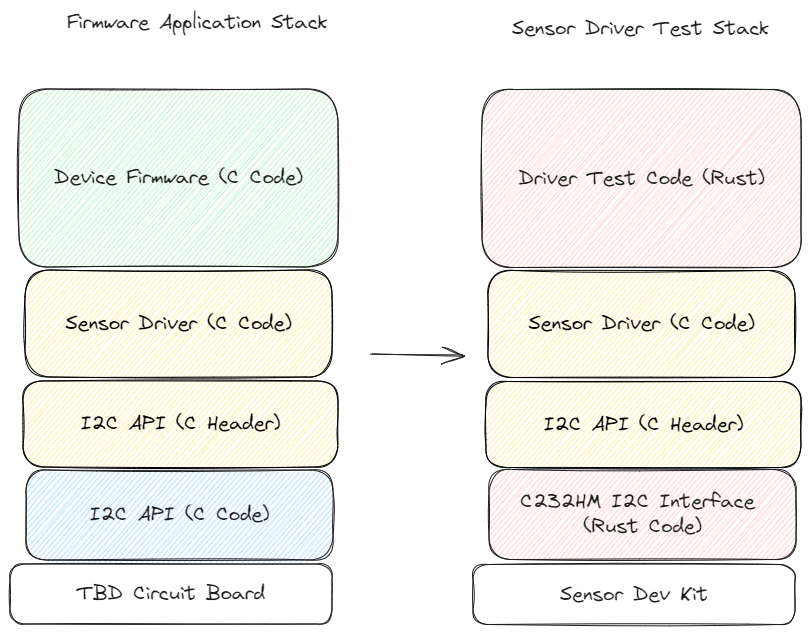
Roughly what I came up with when thinking about how to convert the application engineering stack
from C to Rust for testing.
Ideally, I wanted to test the C code and focus my development there. I didn’t want very much Rust
(since the final code is C anyways) and just wanted it to work. All I really needed to do was
provide an I2C interface for the sensor driver code, compile it all together, and see if the driver
was working properly.
Thankfully, I found the awesome ftdi-embedded-hal
crate that exposed an I2C implementation from the FT232H with a simple API. It also happened to
use the exact same pinout as my dev kit, which was awesome.
The process to realize the C to Rust infrastructure was pretty simple:
- Compile the sensor driver C code during the Rust project build process
- Generate bindings for the C code so that I can call it from within Rust and provide Rust
implementations for I2C access.
There were a few tools that I needed to handle combining the Rust and C code:
cc - Handled compiling my C code sensor driver implementation
alongside my Rust project so that I could test the C implementation.bindgen - Generated the necessary FFI (foreign function
interface) bindings for I2C and the light sensor APIs.
Thankfully, this can also be done automatically within a Rust build script so that it happens
whenever you build a rust project (via a build.rs file):
// build.rs contents
extern crate bindgen;

use std::env;
use std::path::PathBuf;

fn main() {
    // Rerun this process if any of the external sensor driver code changes
    println!("cargo::rerun-if-changed=../c_project/src/sensor_driver.c");
    println!("cargo::rerun-if-changed=../c_project/src/sensor_driver.h");

    // Generate bindings for the sensor driver C code so we can call it from Rust.
    let bindings = bindgen::Builder::default()
        .allowlist_file("sensor_driver.h")
        .generate()
        .expect("Unable to generate bindings");

    // Compile the C-based sensor driver code.
    cc::Build::new()
        .file("../c_project/src/sensor_driver.c")
        .cpp_link_stdlib("stdc")
        .compile("as7343");

    // Put the automatically generated Rust bindings for the C code into the Rust project.
    let out_path = PathBuf::from(env::var("OUT_DIR").unwrap());
    bindings
        .write_to_file(out_path.join("bindings.rs"))
        .expect("Couldn't write bindings!");
}
The main project file was also pretty simple, as I just wanted to verify I could perform
measurements:
// main.rs file

// Include the bindings we generated using bindgen so we can call the `sensor_drvier_*` functions
// that are defined in C
include!(concat!(env!("OUT_DIR"), "/bindings.rs"));

use libftd2xx::Ftdi;

fn main() {
    let ft232h: Ft232h = Ftdi::new().unwrap().try_into().unwrap();

    // Open an I2C interface on the FT232H at 100KHz.
    let device = ftdi_embedded_hal::FtHal::init_freq(ft232h, 100_000).unwrap();
    let i2c_interface = device.i2c().unwrap();

    // Begin basic sensor testing. This is calling into the C API that bindgen is providing us
    // access to.
    unsafe {
        sensor_driver_init();
        sensor_driver_prepare_measurement();

        sensor_driver_start_measurement();
        while !sensor_driver_measurement_complete() {
            // Wait for the measurement to complete.
        }

        let mut result = [0u8; 16];
        sensor_driver_read_result(&mut result);
        println!("Measurement result: {result:?}");
    }
}
Trying to compile this without providing the necessary I2C implementation for the C code results in
the compiler (justifiably) complaining about not being able to find definitions for the i2c
functions:
// .... Attempting to run the above results in complaints about missing function references.

          C:\Users\rsummers\Documents\repositories\c_project\sensor-test\..\src\sensor_driver.c:23: undefined reference to `i2c_write'
          C:\Users\rsummers\Documents\repositories\c_project\sensor-test\..src\sensor_driver.c:92: undefined reference to `i2c_read'
          collect2.exe: error: ld returned 1 exit status

  = note: some `extern` functions couldn't be found; some native libraries may need to be installed or have their path specified
  = note: use the `-l` flag to specify native libraries to link
  = note: use the `cargo:rustc-link-lib` directive to specify the native libraries to link with Cargo (see https://doc.rust-lang.org/cargo/reference/build-scripts.html#rustc-link-lib)

error: could not compile `sensor-test` (bin "sensor-test") due to 1 previous error; 0 warnings emitted
The sensor driver code only used a few basic I2C functions to do everything, so there
wasn’t much that needed to be implemented on the Rust side.
void i2c_read(uint8_t address, uint8_t *buffer, size_t len);void i2c_write(uint8_t address, uint8_t *buffer, size_t len);
We can fix the compile errors by providing the necessary i2c functions in a new c_api.rs file.
There’s a little bit of global-variable shenanigans here to make the single I2C instance shared
across the various I2C functions, since Rust and C have different models around variable ownership.
This is largely just boilerplate needed to get things to work in my case since I’m not doing
anything multithreaded or complex:
use std::sync::{Mutex, OnceLock};

use crate::bindings::*;

use embedded_hal::i2c::*;
use libftd2xx::{Ft232h, Ftdi};

// Create global singletons of the I2C device so that we can access them via the i2c_read and
// i2c_write functions.
static _device: std::sync::OnceLock<ftdi_embedded_hal::FtHal<Ft232h>> = OnceLock::new();
static i2c: std::sync::OnceLock<Mutex<ftdi_embedded_hal::I2c<Ft232h>>> = OnceLock::new();

// Open the I2C interface and prepare it for use by the driver.
pub fn open_i2c() {
    let ft232h: Ft232h = Ftdi::new().unwrap().try_into().unwrap();
    let device = ftdi_embedded_hal::FtHal::init_freq(ft232h, 100_000).unwrap();
    let i2c_interface = device.i2c().unwrap();

    // Store the I2C and FTDI chips as global singletons so we can use them in other functions
    // later.
    i2c.set(Mutex::new(i2c_interface)).unwrap();
    _device.set(device).unwrap();
}

#[no_mangle]
pub extern "C" fn i2c_read(addr: u8, buf: *mut u8, count: usize) {
    let buf: &mut [u8] = unsafe { core::slice::from_raw_parts_mut(buf, count) };
    i2c.get()
        .unwrap()
        .lock()
        .unwrap()
        .read(addr, &mut buf[..])
        .unwrap();
}

#[no_mangle]
pub extern "C" fn i2c_write(addr: u8, buf: *const u8, count: usize) {
    let buf: &[u8] = unsafe { core::slice::from_raw_parts(buf, count) };
    i2c.get()
        .unwrap()
        .lock()
        .unwrap()
        .write(addr, &buf[..])
        .unwrap();
}
Now, if we include that in our main.rs file, we can successfully run it:
// Include the bindings we generated using bindgen so we can call the `sensor_drvier_*` functions
// that are defined in C
include!(concat!(env!("OUT_DIR"), "/bindings.rs"));

// Include the newly added C API for I2C.
mod c_api;

fn main() {
    // Open I2C so that it can be accessed by the C API.
    c_api::open_i2c();

    // Begin basic sensor testing of the C API that is imported in the bindgen bindings.
    unsafe {
        sensor_driver_init();
        sensor_driver_prepare_measurement();

        sensor_driver_start_measurement();
        while !sensor_driver_measurement_complete() {
            // Wait for the measurement to complete.
        }

        let mut result = [0u8; 16];
        sensor_driver_read_result(&mut result);
        println!("Measurement result: {result:?}");
    }
}
Running this code with cargo run successfully prints out sensor measurements! We can also probe
the I2C lines of the dev board to see all of the I2C transfers taking place to confirm. We can even
modify the sensor-driver.c file and see the results immediately when we re-run the Rust code.
This is now a solid development platform where I can update the sensor driver C code and immediately
start testing it on my computer with Rust, and I’m no longer bottle-necked by the hardware that
still needs to get built!
Conclusion
Rust is an awesome language because of the massive reusability that the crates.io ecosystem
provides. Unfortunately, it’s often hard to incorporate into existing projects because of legacy C code.
Thankfully, there’s a lot more uses for Rust outside of device firmware where it can help empower us
to get our jobs done faster! I thought this was a super cool way to uncouple firmware development
from hardware and get projects done faster faster.
The total time it took me to set things up was less than 60 minutes and that was largely because
I’ve never used cc or bindgen before. This is going to give me a solid base to get our sensor
driver code updated, and I hope it inspires you to to look for more ways that Rust can be used!